ABOUT THOSE GREENS . . .
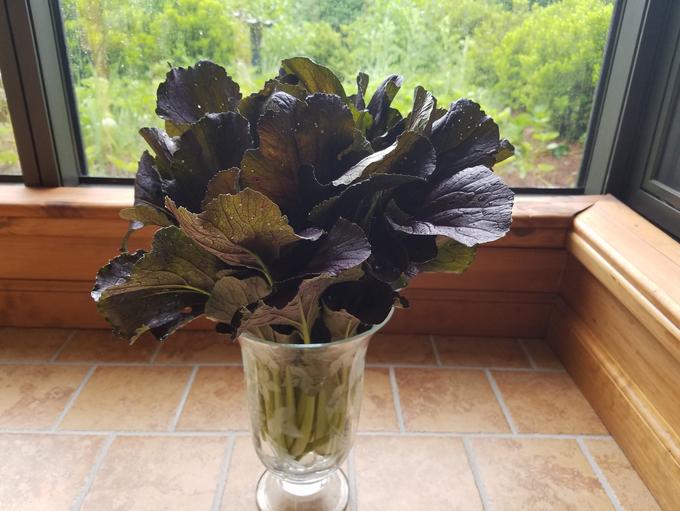
Spring greens come in all shades of green and purple, too! We do not think we put too many spring greens in the CSA Boxes. Members who truly love greens agree with us. However, for CSA Members new to eating vegetables, greens might be a source of stress. I am going to address what to do with these greens here. (Also under Recipes: F – L section)
We are always ready for fresh salads when spring arrives–and our family can eat a lot of greens in salads! We also like to saute greens. For years sauteing was the only way I would preserve my mixtures of turnip greens, collards, mustards, and kale. They make a bowlful of nutrition which goes well with a slice of pizza or a bowl of soup in the winter. And two recent studies have indicated that a serving of greens each day slows brain aging by over a decade!
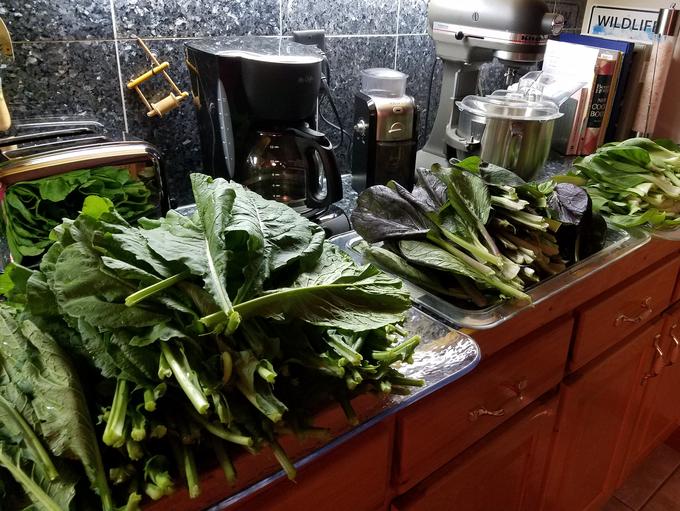
Christmas of 2017 I got a fancy new blender which opened up a new culinary window for me. In January 2018 I was purchasing “fresh” greens at a local market because I wanted to play with my new toy which my grandson calls “Grandma’s Robot.” I was not particularly pleased with the flavor; thus, the Spring of 2018 was the first time I experimented with freezing greens from our garden specifically for use in smoothies. Now I am hooked–but this is a healthy addiction!
I always recommend blanching before freezing if you plan to keep the greens more than one month before using. This step preserves the nutrients and vibrant color. When making a smoothie to drink immediately, you would not need to go through the blanching steps which I will give below. However, if your greens are getting to be too much and you do not want to give them away to a neighbor or friend, you might consider putting them in the freezer for later. If you do not drink green smoothies, the “greens cubes” can be tossed into most soups and many sauces for an extra serving of veggies–or for a “hidden serving” of veggies, if that’s what you need to do in your family!
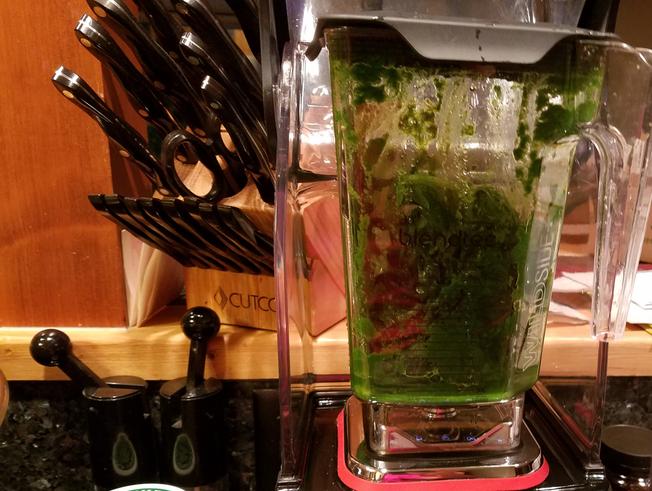
As always, the most time goes into washing the greens before blanching them for only three minutes. Next plunge them into ice water for three minutes, drain, and toss into the blender to puree for a few seconds. Depending on the amount of greens I am dealing with, I sometimes find it convenient to freeze the bright green mixture in ice cube trays.

A glass baking dish also works, but then one must cut the finished frozen product into cubes or bars. I have found wrapping individual frozen cubes or bars in BPA free baggies makes it easier to extract the needed amount when making an individual smoothie.

My smoothie greens are a mix of spring greens: turnip greens, mustard greens, baby collards, red and green kale–really just whatever I have available at the time. Asian greens are also delicious in smoothies, but we like to eat these raw in our spring salads. And we do mix all of the other greens into those salads, too!
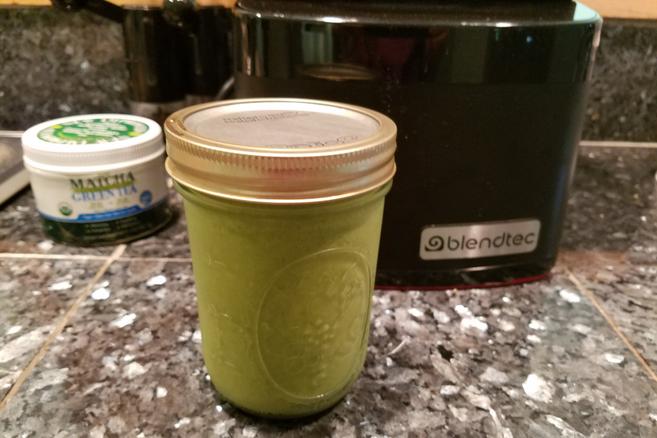
My smoothie recipe is simple and basic: 1/3 liquid (ie: coconut water, coconut milk); 1/3 greens and other veggies (ie: avocado, carrots, beets); 1/3 fruit (usually my fruit is frozen–except for bananas–but they can be frozen, too). I always toss in some lemon juice–sometimes fresh and sometimes frozen. Often I will add flax seed or hemp seed or even aloe to the mixture. Really the sky is the limit when it comes to making a smoothie. Honey is good for beginners to give a sweet taste.
You can see I use the freezer a lot. This is so I always have the ingredients on hand when I want them. We live in the country and the grocery stores are not terribly far away, but when I am cooking I don’t like to have to break away to do shopping for ingredients. Planning ahead and having a well-stocked pantry of often used items can save one a lot of time when it comes to meal preparation.
We do not plan on overwhelming you with spring greens. But every family is different, so if you feel you are being overwhelmed, take a few minutes and try out these ideas. The greens will disappear very quickly if you are tossing them into a blender!
Or you can just wash and toss the greens into a freezer bag in the freezer without blanching. Do this only if you intend to use them in the very near future. Once frozen, they will break easily and can be stuffed into a blender.
Or skip the processing altogether and give any extra greens to a neighbor or friend. We love even this choice because you are helping to introduce our CSA Farm to others in the community. Just be sure to do something while the veggies are nice and fresh. Please do not let the fruits of our labors go unused! Wasting is so sad . . .

A FEW WORDS ON ASPARAGUS . . . RIP
Robert and I have attempted to grow asparagus for 26 years and have been successful by most standards. Thousands of crowns have been planted and replanted at great cost in both money and physical labor. After much contemplation, we have come to the conclusion the WNC winters do not get cold enough to make for the best asparagus growing environment. Additionally, the many drought years were devastating to the crowns.
We have reached acceptance and relinquishment when it comes to growing asparagus. A farmer or a gardener must be comfortable with uncertainty in the garden. Sometimes proper planning and preparation simply is not enough when working in Nature with Nature.


“Asparagus” is in our family farm business name and it will remain as a part of our legacy since white asparagus is the first crop we marketed. However, the “& Company” represents the other nearly 90 vegetable varieties we attempt to grow most every year–but no more asparagus!
Asparagus is frequently at a “loss leader” at grocery stores in the spring of the year. Watch for it and when it is plentiful, enjoy!
BRAISED FLAT BEANS
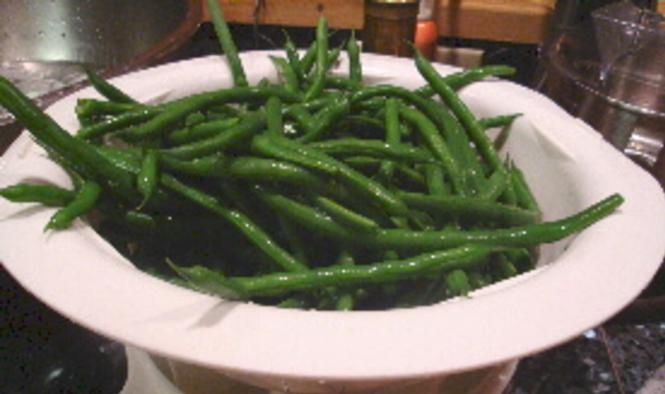
I tend for the simple and quick ways of cooking during the harvest season. I cut the flat or broad beans into one-inch pieces and braised the beans in vegetable broth in a skillet until they were tender. I added a dash of garlic and freshly ground pepper. Just before serving I added some fresh parsley. Rarely will you find strings on any of our beans because we harvest them all when they are young on the vine!
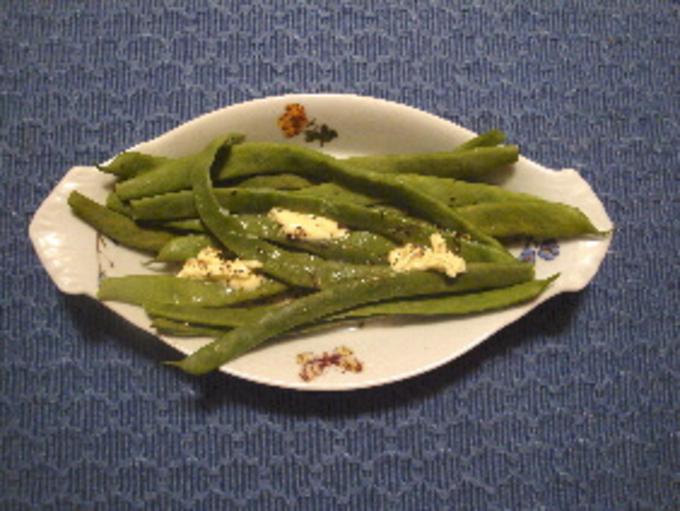
We have also simply steamed the roma beans whole and served them with a dollop of butter! This is a “slow food diet dish” because you will be forced to cut each bite off of the bean with a knife before eating!
GREEN BEANS WITH ALMONDS
Wash beans and remove stem end. Blanch in boiling water for about 2 minutes. Remove and immediately place into iced water to stop them from cooking AND to retain the bright green color. In a pan over a medium heat, place 2 TBSP Smart Balance. Add the green beans and stir fry for about 2 minutes. Add 1/4 cup sliced almonds and continue to stir fry another 2 minutes to toast the almonds. Garnish with chopped parsley before serving.
BEANS WITH HERBS
1 pound beans, trimmed, yellow or green
1 TBS minced onion
1 1/4 TBS Dijon Mustard
1 1/2 TBS Balsamic Vinegar
1/4 cup virgin olive oil
1/2 tsp lemon juice
Salt & freshly ground pepper to taste
2 TBS chopped dill or parsley
Steam or cook the beans in a saucepan of boiling water until crisp tender. Drain and keep warm. Combine the onion, mustard, vinegar, olive oil and lemon juice in a microwaveable dish. Add salt and pepper to taste. Whisk together then pour over the beans. Toss to coat. If necessary, microwave a minute to reheat the beans. Sprinkle with the dill or parsley and serve immediately.
SAUTEED BEANS
Let me remind you how easy it is to freeze beans! See Freezing Vegetables on the F – L Recipe Page.
If you blanch beans for three minutes as when preparing for freezing and then plunge them into cold water to cool for three minutes, you might decide to quickly reheat them in a hot skillet with a bit of butter and serve! It takes just minutes to put a slight “burn” mark on tender baby beans. Throw in a few almonds if you wish. Add parsley after taken off of the heat.

BEANS—ROASTED
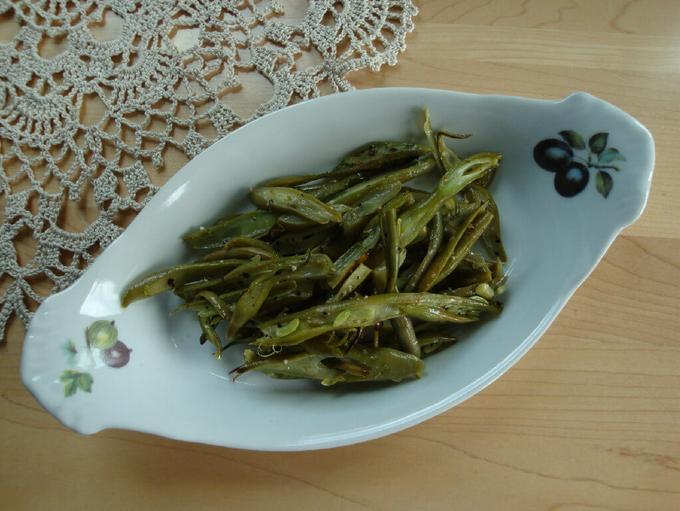
As the beans become more mature, we prefer breaking them in half and dropping them lengthwise into the food processor to make French cut beans which we then roast in a hot (400 degree) oven with a drizzle of olive oil, freshly ground pepper and salt or lemon pepper or freshly ground garlic. Stir the dish a couple of times while roasting until fork tender (not crispy—unless this is the look you are going for). A handful of sliced almonds the last minute add an extra sweetness and texture to the dish.
This dish is good hot or cold . . . a red pepper would be a nice addition! Too bad it’s too early in the season for those to be coming in from our garden. Roasting brings out all of the natural sugars as in any vegetable. And the French cut brings a nice visual appeal to any meal. As an added bonus for this time of the year, the bug bites will disappear, too! Also, this recipe freezes well.
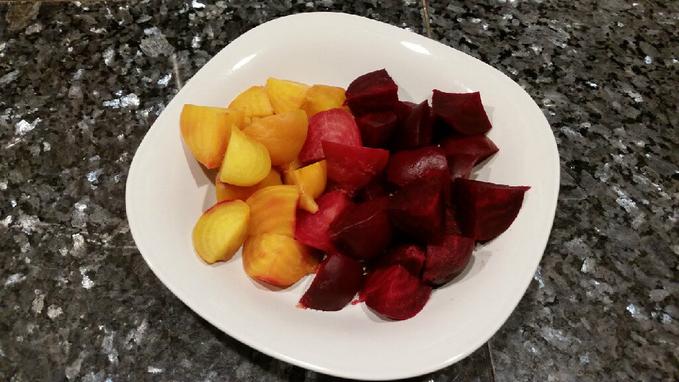
BOILED BEETS
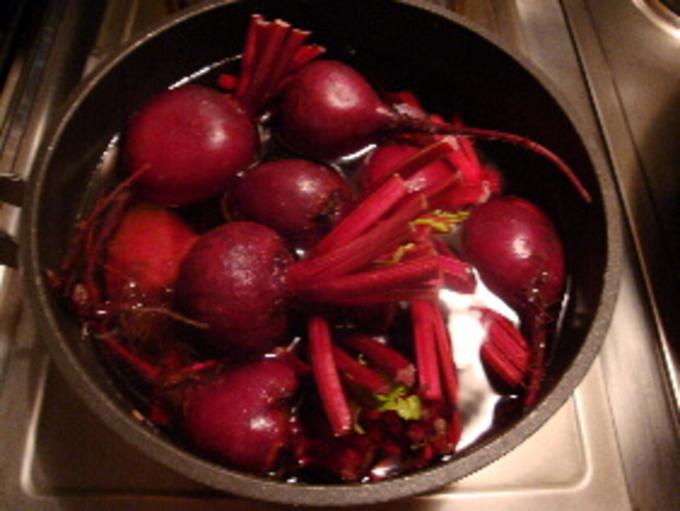
No matter what recipe you deem to make, you will first probably want to skin the beets. Begin by washing them (only slightly) and boiling them in covered pan in water which covers the beets. Bring the water to a fast boil and then simmer until they are fork tender. It make take over twenty minutes. After removing from the heat, dump the water and pour cold water over the beets to begin to cool them. After a couple of minutes, gently “rub” the peel off of the beet. I suggest you do this under running water unless you want beet stained fingers! And if you do end up with red fingers, use some salt to rub the color away.
Beets can be sliced, diced, or left whole and served with butter alone. I have a hard time getting to even the butter stage when I am preparing fresh beets and have been known to even eat them raw—so sweet! And actually, a raw beet is a beautiful addition to any salad or coleslaw when shredded on top!
ATTENTION: Beet Juice will stain anything it touches! To remove the pinkish stain from your fingers, try rubbing with salt or lemon juice.
REMINDER: To store beets, cut off the leaves about one inch ABOVE the top because when stored in the refrigerator the leafy greens will draw the moisture from the root greatly reducing the flavor and, eventually, causing the veggie to which they are attached to become rubbery. Of course, it is much better to eat than to “store” your CSA veggies! And do not discard the beet tops which can be braised or tossed into a salad adding flavor and nutritional value.
PICKLED BEETS
Mix ½ cup vinegar with ¼ cup sugar, dash of salt, and 1 TBSP Pickling Spices Mix. Bring to a boil and cook slowly for 10 – 15 minutes. Strain out pickling spices. Pour liquid over about two cups of sliced cooked beets. These beets can be served at room temperature or cold as a side dish or in a salad. They will last several days in the refrigerator.
Beets can also be marinated in fresh lemon juice, olive oil and fresh herbs.
PINK, PICKLED EGGS
Place peeled, hard-boiled eggs into the leftover liquid from pickled beets, and let them set in the refrigerator for 3 – 4 days. This will preserve them so they will keep longer. And yes, the white part of the egg will turn pinkish around the yolk! Don’t forget to stir them once or twice a day for an even color.
Slice in half and serve on top of greens or beets for a pretty dish!
BORSCH (RUSSIAN BEET SOUP)
Peel and finely chop the following vegetables: 1 cup onion, 1/2 cup carrots, 2 cups beets. Put into pan & barely cover with water. Bring to a boil. Cover & simmer 18 – 20 min.
Meanwhile, finely shred 1 cup cabbage. To cabbage add 1 TBSP Smart Balance, 2 cups fat free beef broth, 1 TBSP white vinegar. Put this mixture into the beet pan and simmer 15 more minutes.
This soup can be served hot or cold . . . which means it can be prepared in advance! When ready to serve, put the soup into bowls. To each bowl add 1 TBSP of your favorite type of sour cream and a garnish of finely chopped cucumber, or freshly chopped herbs such as parsley or chives.
ROASTED BEETS
1 1/2 pounds beets, uniform in size, whole or halved
2 TBSP olive oil
1/4 tsp freshly ground pepper, dash salt
1 tsp grainy mustard
2 TBSP orange marmalade
1 tsp burgundy wine vinegar
Fresh parsley or rosemary, chopped
Wash, trim and dry beets. Leave 1/2 inch stem and root intact. Drizzle beets with 1 TBSP olive oil and ground pepper and dash of salt. Toss to coat. Place beets in a roasting pan (lined w/ foil for easy cleanup) in a single layer. Roast in a 400 degree oven for 45 minutes, stirring every 15 minutes, or until beets are tender to the prick of a fork. Remove from oven.
While beets are cooling, make the dressing from the orange marmalade, mustard, and vinegar. Whisk in remaining 1 TBSP olive oil and herb of choice. Set aside. Rub skins from beets, and cut as desired. Toss warm beets with dressing. Let stand at room temperature for 30 minutes while the beets absorb the dressing.
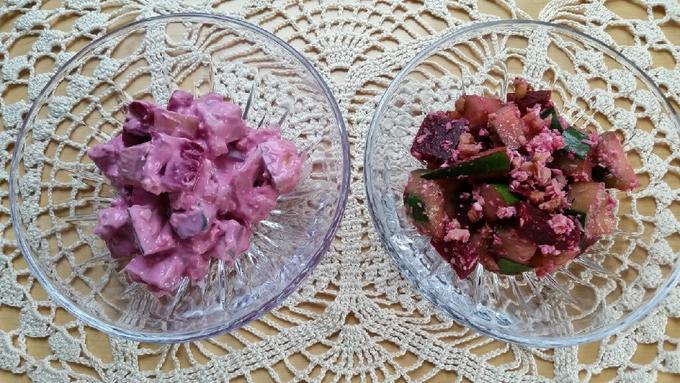
BEET AND CUKE SALAD
1 large beet, cooked
2 small cucumber
2 firm tomatoes, if desired
1 tsp sugar
5 Tbsp fresh coconut flesh—I use frozen, as I always have it available
1/8 tsp coriander seed
6 Tbsp chopped walnuts
2 small containers of plain yogurt—I like thick Icelandic style cream-skyr (say skeer)
Salt to taste
Peel and dice the beet. Peel the cucumber, if desired; however I just take strips off of the peel when using our cucumbers as I do not find them to be bitter, usually. Taste test to verify.
Peel the tomatoes, if desired, and dice. Put all of these vegetables into a large salad bowl, sprinkle with salt and the sugar. Gently stir in the coconut flesh, coriander, walnuts, and yogurt.
Chill and serve. Makes: 6 servings.
I think sour cream would work as a substitute. In this case, you might want to double the sugar!
If you want a “less pink” salad (than on the left below), leave out the yogurt or sour cream (salad on the right) because the beets will turn the white to pink; however, doing so with give you about ten ounces less finished product, of course.
I only use tomatoes when they are “in season” in our gardens so these photos are without tomato.
HIDING THE BEETS (when necessary):
In the February 2013 Parenting magazine, Catherine McCord author of Weelicious cookbook and founder of Weelicious.com tells chefs how to hide the beets! Her methods work well for picky eaters of all ages . . .
BASIC ROAST BEETS
Preheat the oven to 375 degrees F. Wrap the beets in foil and bake for 45 minutes, or until fork-tender. Remove the beets from the foil land set aside until cool to the touch. Put your hand in a zip-top bag (to avoid staining it) and rub the skins from the beets. Puree until the beets are smooth.
BRIGHT START (BEET PANCAKES)
Sift together 1 cup all-purpose flour, 3/4 cup whole-wheat flour, 3 Tbsp brown sugar, 1 Tbsp baking powder, and 1/2 tsp kosher salt into a bowl. Place 3/4 cup beet puree; 1 1.4 cups milk; 1/3 cup plain Greek yogurt; 1 large egg; 3 Tbsp unsalted butter, melted; and 1 tsp vanilla in another bowl and whisk. Add dry ingredients into wet and stir until just combined. Drop about 2 Tbsp of the pancake mixture onto a greased pan over medium heat; cook 3 minutes on each side.
PRETTY IN PINK HUMMUS
Roast and peel 1 medium red beet along with 1 large unpeeled garlic clove (see recipe below). Place the beet; the peeled garlic clove; a 15-oz can of white beans, rinsed and drained; the juice of 1/2 lemon; 1/4 cup olive oil; and 1 tsp kosher salt into a food processor and puree until smooth. Serve with cut-up vegetables or pita chips.
CHOCOLATE VELVET BEET CUPCAKES
Preheat the oven to 350 degrees F. Sift together 1/3 cup cocoa powder, 1 1/2 cups flour, 2 tsp baking powder, 1/2 tsp baking soda, 3/4 cup sugar, and 1/2 tsp salt into a bowl. In a separate bowl, whisk together 2 large eggs; 1/3 cup vegetable oil; 1 large beet, roasted and pureed; and 2 tsp vanilla. Slowly stir dry ingredients into wet. Pour 1/3 cup batter into 12 paper-lined muffin cups. Bake for 25 minutes, or until a toothpick comes out clean.
PINK FROSTING
Place one 8-oz package cream cheese, 1/2 cup unsalted butter, 1/4 cup powdered sugar, 1/2 cup beet puree, and 1 tsp vanilla in a mixer and beat on medium-high until fluffy. Spread on cooled cupcakes.
BTW: Pink Frosting works on Zucchini Bread Cupcakes, too.
Serve this pasta dish with your favorite salad and bread. Put extra olive oil infused with herbal seasoning on another plate and dip your bread!
BROCCOLI & CHICKEN WITH RAVIOLI
1 (9-ounce) package ravioli, prepared according to package directions
1 (10-ounce) jar Alfredo Sauce
4 chicken breasts, cooked
2 cups broccoli florets,steamed—until just fork tender
Cook chicken in fry pan over medium heat until hot; toss with pasta, broccoli and Alfredo Sauce. Heat through.
To cut the calories, just mix the steamed broccoli in with any type of pasta and some extra virgin olive oil.

I made a couple of attempts before I got this quiche to have the flavor and texture I had in mind. Experimenting in the kitchen is called being creative with the veggies!
Glenda’s Broccoli Quiche YIELD: 6 slices
Start with raw broccoli, fresh mushrooms, and sweet onion. The amounts of each can vary, but approximately 1 1/3 cup broccoli, 1/3 cup mushrooms and 1/3 cup sweet onion, plus 2 -3 TBSP fresh parsley.
Chopped the above and sauté in 3 TBSP butter. It will equal about two cups. Spread the mixture into the bottom of a partially-baked, deep dish, pie shell.
For the filling mix together:
1 cup milk or cream
2 -3 eggs, depending on size
1/2 tsp salt and freshly ground black pepper to taste
3 ounces shredded Swiss cheese (about 3/4 cup)
Pour the filling over the broccoli mixture. Bake at 375 degrees in a convection oven for 23 minutes.
I have not tried freezing after this is cooked, but I expect it would be fine. I sometimes make the recipe (except for the shell, of course) and pour it into a bag and freeze it. When I want a quick quiche, I thaw the bag in a cool water and pour the ingredients into a pre-baked pie shell. It comes out looking like the photo above–all mixed up with the Swiss cheese mostly coming to the top.
BROCCOLI SALAD
1 – 3 heads of broccoli, cut into small florets
1 cup sliced seedless red grapes
1 cup chopped celery
1 cup cooked bacon, chopped
1 cup toasted almonds
Dressing:
3 cups mayonnaise
1 cup sugar
1 ½ tsp balsamic vinegar
Whisk all three ingredients together in a bowl. Make a day ahead if possible so the flavors can blend. The dressing will keep a couple of weeks in the refrigerator.
In a large bowl, combine all the ingredients except dressing and mix well. Then toss the mixture with the dressing until everything is well coated. Let this salad chill for one hour before serving. (You can vary the amounts of the ingredients in equal proportions to match the amount of broccoli or florets you have available.)
Variation: Use raisins, Craisins, pecans and purple onion!
QUICK CASSEROLE
1 can (10-3/4 oz.) condensed cream of mushroom soup (see Cream of Anything Soup under “S”)
1-1/2 cups milk and or vegetable broth
1 cup broccoli florets
1-1/2 cups quick cook brown or wild rice, uncooked
2 cans (6 oz. each) tuna or chicken, drained, flaked
1 cup shredded cheddar cheese
Mix soup, milk or broth, and broccoli florets in medium saucepan. Bring to boil, stirring occasionally. Add rice and tuna or chicken; mix lightly. Spoon into 2-quart casserole. Sprinkle with cheese. Bake at 375°F for 20 minutes or until thoroughly heated.
Note: If you want to toss some cauliflower florets into the dish, I would suggest blanching or steaming them first.
